
If you’re looking to create a creamy coconut ice cream that feels like a tropical escape, you’re in the right place. With just a few simple ingredients, you can whip up a delightful treat that’s perfect for warm days. You’ll want to start with a rich coconut base and consider some tasty enhancements. But what’s the key to achieving that velvety texture? Let’s explore the essential steps together.
What Is Coconut Cream?
Coconut cream is the luscious, thick layer that forms when you blend fresh coconut meat with water. This rich, creamy substance has a velvety texture and a sweet, tropical flavor that can elevate many dishes. It’s not just a dairy alternative; it’s a culinary delight.
You can use coconut cream in desserts, curries, or as a base for smoothies. You’ll find it adds a luxurious touch to your recipes, making them feel indulgent.
Coconut cream is also packed with healthy fats, giving you a satisfying energy boost. When choosing coconut cream, look for brands with minimal additives to enjoy its pure flavor.
Incorporating it into your cooking will surely impress your taste buds and anyone you share it with!
Essential Coconut Cream Base
Creating a creamy coconut cream base is the heart of your ice cream adventure.
You’ll want to focus on a few key elements that bring out the best flavors and textures.
Here’s what you need to think about:
- The richness of creamy coconut milk
- The subtle sweetness of natural flavor enhancements
- The velvety texture that melts in your mouth
Creamy Coconut Milk Base
For a luscious ice cream experience, a creamy coconut milk base is essential. This base brings a rich, velvety texture that makes every scoop a delight.
You’ll love how effortlessly it blends into a perfect dessert, leaving you craving more.
Here are three key benefits of using a creamy coconut milk base:
- Decadent Flavor: It offers a naturally sweet and tropical taste that transports you to paradise with each bite.
- Silky Texture: The creaminess ensures a smooth, melt-in-your-mouth experience that pleases your palate.
- Dairy-Free Delight: It’s an ideal choice for those who are lactose intolerant, allowing everyone to indulge without worry.
With this base, you’re on your way to ice cream bliss!
Flavor Enhancements
With a creamy coconut milk base in place, it’s time to elevate your ice cream with exciting flavor enhancements.
These additions will take your coconut ice cream from good to unforgettable!
- Fresh Mango Puree: Swirl in vibrant mango puree for a tropical twist that bursts with sweetness and tang.
- Toasted Coconut Flakes: Fold in toasted coconut flakes to amplify that rich coconut flavor and add a delightful crunch.
- Dark Chocolate Chips: Mix in dark chocolate chips for a luxurious contrast that balances the sweetness with a hint of bitterness.
Each of these enhancements brings a unique character to your ice cream, turning it into a blissful treat you won’t be able to resist.
Enjoy experimenting and savoring every scoop!
Detailed Preparation Guide

To create your creamy coconut ice cream, you’ll want to chill the coconut mixture thoroughly first.
Then, simmer it until it thickens, enhancing that rich flavor.
Finally, don’t forget to garnish with toasted coconut for an extra crunch!
Chill Coconut Mixture Thoroughly
Chilling the coconut mixture thoroughly is crucial for achieving that creamy texture you crave in homemade ice cream. If you skip this step, you might end up with a grainy or icy result, which no one wants.
Here’s how to ensure your mixture is perfectly chilled:
- Refrigerate for at least 4 hours: This allows the flavors to meld beautifully, enhancing the overall taste of your ice cream.
- Cover tightly: Use plastic wrap or a lid to prevent any unwanted odors from your fridge affecting the mixture.
- Check the temperature: Aim for a chilly 40°F (4°C) or lower before churning; this makes a world of difference in texture.
With these steps, you’ll be one step closer to coconut ice cream bliss!
Simmer Until Thickened
As you prepare to simmer the coconut mixture, keep in mind that this step is key to achieving a rich, creamy consistency. Gently heat the mixture over medium-low, stirring frequently. You’ll notice it begin to thicken, transforming into a luscious base perfect for ice cream.
Here are three essential tips to enhance your experience:
- Stay Present: The aroma of coconut will fill your kitchen, sparking joy as you imagine the final treat.
- Watch Closely: Pay attention to the texture; you want it to coat the back of a spoon perfectly.
- Patience is Key: Allow the mixture to simmer gently—rushing this step can lead to a disappointing outcome.
Enjoy the process as your creamy coconut dream comes to life!
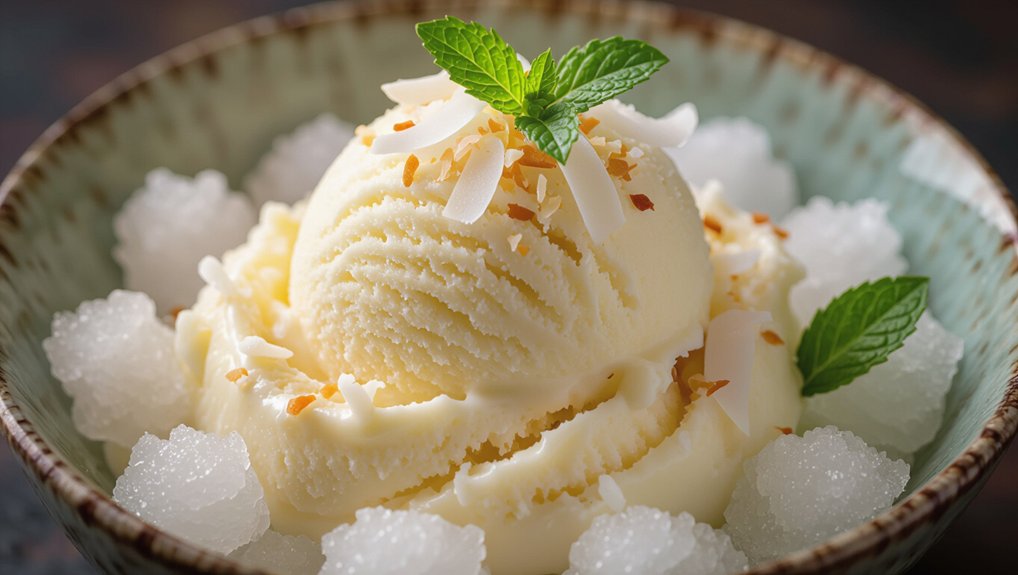
Garnish With Toasted Coconut
After simmering your coconut mixture to perfection, it’s time to elevate your ice cream with a delightful garnish of toasted coconut. This simple addition will bring a warm, nutty flavor and a satisfying crunch to your creamy treat.
Here’s how to do it:
- Preheat your oven to 350°F (175°C). Spread unsweetened coconut flakes on a baking sheet.
- Toast the coconut in the oven for about 5-7 minutes, stirring occasionally, until it’s golden brown and fragrant. Keep a close eye; it can burn quickly!
- Cool and sprinkle the toasted coconut over your ice cream just before serving.
This garnish not only enhances the flavor but also adds an irresistible texture that’ll make every scoop feel like a tropical getaway!
Ingredients List
Creamy Coconut Ice Cream
Indulge in a tropical treat with this rich and creamy coconut ice cream, perfect for warm days.
| Prep Time | Cook Time | Total Time | Servings |
| 10 mins | 0 mins | 10 mins | 4 servings |
Ingredients
- 2 cans full-fat coconut milk
- 1 cup granulated sugar
- 1 teaspoon pure vanilla extract
- Pinch of sea salt (optional)
- Shredded unsweetened coconut (for garnish)
Instructions
- In a mixing bowl, combine the coconut milk and sugar until well blended.
- Add the vanilla extract and sea salt, mixing until fully incorporated.
- Pour the mixture into your ice cream maker and churn according to the manufacturer’s instructions.
- Transfer the ice cream to a container and freeze for at least 4 hours or until firm.
- Serve with a sprinkle of shredded coconut on top.
Chill Bowls Before Serving
Chilling your bowls before serving coconut ice cream makes a world of difference in your dessert experience. You’ll enjoy the creamy texture at the perfect temperature, enhancing every bite. Plus, it’s super easy to do!
- Feel the refreshing chill as you scoop the ice cream.
- Savor the smooth, velvety richness with each spoonful.
- Impress your friends and family with this simple yet effective trick.
Benefits Of Chilled Bowls
While you mightn’t think much about the serving vessel, using chilled bowls can elevate your creamy coconut ice cream experience significantly.
When you serve your ice cream in a chilled bowl, it helps maintain the perfect texture and temperature, keeping it creamy and smooth longer. No one wants a melted mess, right?
Chilled bowls also enhance the overall enjoyment by providing a refreshing sensation when you take that first bite.
Plus, they add a touch of sophistication to your dessert presentation. You’ll impress your guests and make your ice cream feel like a special treat.
Perfect Temperature For Serving
Serving your creamy coconut ice cream at the right temperature makes all the difference in flavor and enjoyment. Ideally, you want to let the ice cream sit out for about 5 to 10 minutes before scooping. This softens it just enough to enhance its creamy texture and rich taste.
If it’s too hard, you’ll miss out on that smooth mouthfeel that makes each bite delightful.
Chilling your bowls beforehand is a game-changer, too. Cold bowls help keep your ice cream at the perfect serving temperature longer, ensuring every scoop remains irresistibly creamy.
Easy Chilling Techniques
To elevate your ice cream experience, chilling your bowls can make a noticeable difference. Start by popping your bowls in the freezer for about 10 to 15 minutes before serving. This simple step helps keep your creamy coconut ice cream at the perfect temperature longer.
You can also chill them in the fridge for a more extended period if you prefer. Just make sure they’re not too cold; you don’t want them to freeze your ice cream!
For an extra touch, consider using metal bowls, as they retain the chill better than ceramic or glass. Your ice cream will stay creamy and delicious, allowing you to savor every spoonful.
Happy scooping!
Caloric Content per Serving
Indulging in creamy coconut ice cream can be a delightful treat, but it’s essential to keep an eye on its caloric content. Understanding how many calories you’re consuming helps you enjoy this dessert without guilt. Typically, a serving of coconut ice cream is around half a cup, which can range from 200 to 300 calories, depending on the recipe and ingredients used. Here’s a simple breakdown:
| Serving Size | Calories | Notes |
|---|---|---|
| 1/2 cup | 200 | Basic coconut ice cream |
| 1/2 cup | 250 | With added sweeteners |
| 1/2 cup | 300 | Includes mix-ins (nuts, fruits) |
| 1/2 cup | 220 | Light coconut milk version |
| 1/2 cup | 270 | Premium brand |
Overmixing the Coconut Base
While preparing your coconut ice cream base, it’s crucial to avoid overmixing, as this can lead to a texture that’s less than creamy. Overmixing introduces too much air, causing your ice cream to become icy rather than smooth. You want that rich, velvety experience with every scoop.
To ensure you achieve the best texture, keep these points in mind:
- Mix just until combined: Blend your ingredients until they’re just incorporated; avoid vigorous whisking.
- Use a gentle touch: Stir slowly and carefully to maintain the creaminess without introducing excess air.
- Taste as you go: Trust your palate; if it feels right, stop mixing!
Follow these tips, and you’ll be on your way to creamy coconut bliss!
Tropical Fruit Toppings
When you think of tropical fruit toppings, mango swirls can elevate your coconut ice cream to a whole new level.
Adding a hint of chocolate chips also brings a delicious contrast to the creamy texture.
Let’s explore how these toppings can transform your dessert experience!
Mango Swirl Addition
To elevate your creamy coconut ice cream, consider adding a luscious mango swirl that not only enhances the flavor but also adds a vibrant pop of color.
This tropical twist will transport your taste buds straight to a sun-soaked paradise.
Here’s how to make your mango swirl unforgettable:
- Fresh Mango Puree: Use ripe, juicy mangoes for a natural sweetness that beautifully complements the coconut base.
- Citrus Zest: A hint of lime or orange zest can brighten the mango flavor, creating a refreshing contrast.
- Swirl Technique: Gently fold the mango puree into your ice cream, creating stunning ribbons that burst with flavor in every scoop.
Chocolate Chip Infusion
Elevate your creamy coconut ice cream by infusing it with rich chocolate chips, which create a delightful contrast to the tropical flavors. The combination of creamy coconut and melty chocolate will take your taste buds on a joyous adventure.
Here are three reasons you’ll fall in love with this combination:
- Decadent Experience: The rich chocolate chips melt beautifully, enhancing each spoonful with a luscious texture.
- Tropical Harmony: The sweet coconut pairs perfectly with the bittersweet chocolate, making each bite a tropical delight.
- Visual Appeal: Those little chocolate flecks add an enticing look, making your ice cream a feast for the eyes as well as the palate.
Dive into this blissful treat, and enjoy a scoop of paradise!
Common Coconut Ice Cream Queries
Got questions about coconut ice cream? You might be wondering what ingredients make it creamy, which dairy-free alternatives work best, or how to store it for maximum freshness.
Let’s clear up those queries to enhance your ice cream experience!
Coconut Ice Cream Ingredients
Crafting the perfect creamy coconut ice cream starts with understanding its key ingredients.
First up, you’ll need full-fat coconut milk, which adds richness and that signature coconut flavor. Don’t skimp here; the creaminess comes from the fat content.
Next, grab some sugar—granulated or coconut sugar works well—to sweeten your treat. A pinch of salt enhances the flavors, balancing the sweetness.
You’ll also want a splash of vanilla extract for depth; it complements the coconut beautifully.
If you’re feeling adventurous, consider adding shredded coconut for texture or a hint of lime zest for a tropical twist.
These ingredients blend harmoniously, creating a luscious ice cream that’s hard to resist.
Enjoy the process as you mix and chill!
Dairy-Free Coconut Alternatives
If you’re looking for dairy-free alternatives to enjoy your coconut ice cream, you’re in luck! Coconut milk is a fantastic base, offering rich creaminess and a hint of coconut flavor.
You can also try coconut cream for an even thicker texture. If you want to mix things up, almond milk or cashew milk can add unique flavors while keeping it dairy-free.
For a nut-free option, oat milk provides a creamy consistency that works well. Don’t forget about adding natural sweeteners like agave syrup or maple syrup to enhance the taste.
Experiment with different combinations to find your perfect blend. Your dairy-free coconut ice cream will be a delicious treat that everyone can enjoy!
Storage Tips for Ice Cream
Storing your creamy coconut ice cream properly can make all the difference in maintaining its delicious texture and flavor.
Keep it in an airtight container to prevent freezer burn and unwanted odors. If you have a large batch, consider dividing it into smaller portions; this way, you won’t expose the entire batch to warm air every time you scoop.
Always let the ice cream sit at room temperature for a few minutes before scooping, as this makes it easier to serve. If you notice ice crystals forming, you can gently stir the mixture to restore creaminess.
Aim to enjoy your ice cream within a month for the best taste, but it can last up to three months if stored well.
Perfect for Summer Gatherings
As summer gatherings heat up, creamy coconut ice cream becomes a must-have treat that delights guests of all ages. Its rich, tropical flavor instantly transports you to a sunny beach, making it the perfect way to cool off.
Whether you’re hosting a barbecue, picnic, or pool party, serving this luscious ice cream adds a touch of indulgence. You can easily pair it with fresh fruits like pineapple or mango for a refreshing twist.
Plus, it’s a fantastic option for those following dairy-free diets, ensuring everyone can enjoy dessert. Set up a sundae bar with toppings like toasted coconut, chocolate sauce, and nuts, and watch your guests create their unique treats.
This ice cream truly elevates any summer get-together!
Frequently Asked Questions
Can I Use Coconut Milk Instead of Coconut Cream?
Yes, you can use coconut milk instead of coconut cream, but it’ll yield a lighter texture. If you want creaminess, consider adding a thickener or reducing it to enhance the flavor and consistency. Enjoy experimenting!
How Long Does Homemade Coconut Ice Cream Last?
Homemade coconut ice cream lasts about one to two weeks in the freezer. For the best texture and flavor, store it in an airtight container and try to minimize exposure to air during storage.
Is Coconut Ice Cream Dairy-Free?
Yes, coconut ice cream is dairy-free! It’s typically made from coconut milk or cream, which replaces traditional dairy. Enjoy a delicious, creamy treat without the lactose, perfect for those avoiding dairy products.
Can I Make This Ice Cream Without an Ice Cream Maker?
Yes, you can make this ice cream without an ice cream maker. Just blend the ingredients, pour them into a container, and freeze, stirring every 30 minutes until it reaches your desired creaminess. Enjoy!
What Other Flavors Pair Well With Coconut Ice Cream?
Mango, pineapple, and lime all pair beautifully with coconut ice cream. You’ll love the tropical vibe! For something richer, try chocolate or caramel. Each flavor enhances coconut’s creaminess, creating a deliciously balanced treat. Enjoy experimenting!
Conclusion
Now that you know how to make creamy coconut ice cream bliss, it’s time to enjoy your creation! Remember to let it soften slightly before scooping for that perfect texture. Don’t hesitate to get creative with toppings like fresh mango or toasted coconut for an extra flavor boost. Serve it in chilled bowls, and you’ll have a delightful treat that’s sure to impress at your summer gatherings. Dive in and savor every creamy bite!